TL;DR

Get coffee and tea gear delivered free with Prime
- Fast, free delivery on millions of items
- Prime Video, Amazon Music and more included
- Member-only deals all year
A no-spill dosing workflow is a repeatable way to measure and transfer liquid while minimizing spills, waste, exposure, and dosing errors. Choose a compatible tool sized for the dose, stabilize both containers, measure and transfer deliberately, verify when accuracy matters, then reseal and clean up.
Match the tool to the volume, liquid viscosity, required accuracy, and material compatibility.
Set source and receiving containers close together on a level, uncluttered surface.
Use the tool’s calibration method, read scales at eye level, and remove syringe bubbles when appropriate.
Treat spill prevention and measurement accuracy as separate checks; verify when an error would matter.
Reseal promptly, clean according to instructions, and standardize the routine for team handoffs.
Field guide · liquid handling
How to Build a No-Spill Dosing Workflow
A repeatable routine makes liquid transfers calmer, cleaner, and easier to check. Match the tool to the liquid and dose, steady the setup, then measure, transfer, verify, reseal, and clean.
Start with the tool, the liquid, and the stakes
Choose for volume, viscosity, readability, compatibility, and the consequence of an error. One tool rarely suits every transfer.
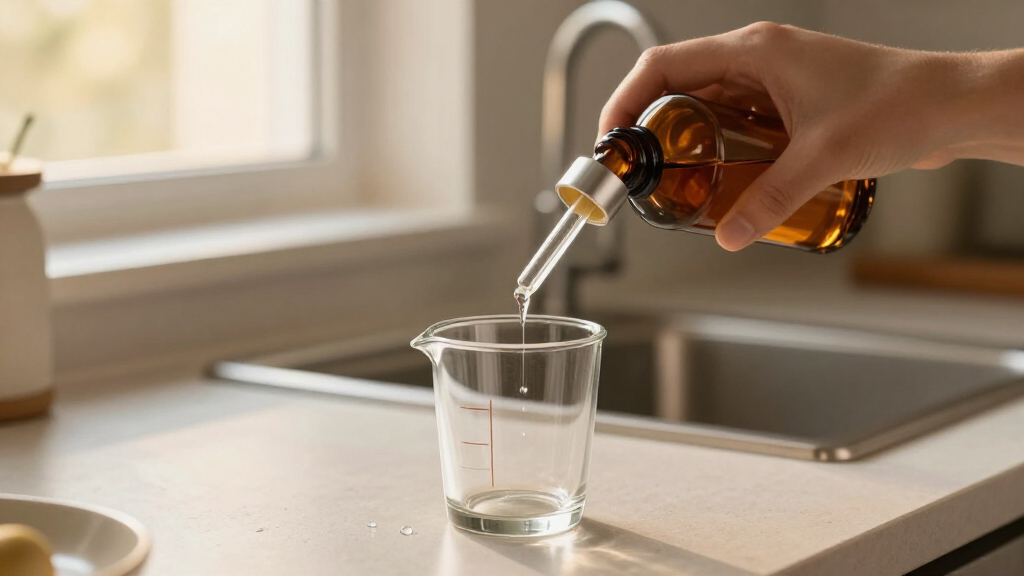
Syringe or pipette
Graduated tools make small doses easier to read. Follow the tool’s calibration method, read at eye level, and remove visible syringe bubbles when appropriate.
Measuring cylinder
Select markings you can see clearly at the amount you need. For example, a small graduated tool is easier to read for 3 mL than a large cylinder with widely spaced marks.
Pump or dispenser
A compatible metered dispenser can reduce repeated open-pour handling. Check wetted parts against manufacturer guidance, especially for corrosive or volatile liquids.
Thick liquids may cling to the tool. Use an opening designed for the job and allow the drain time specified by its instructions.
The repeatable sequence
Seven actions from setup to clean-up
Follow the same order each time. A short written checklist helps teams and households hand off the routine consistently.
Prepare
Gather compatible equipment, the source and receiving vessels, cleanup material, and any required protection.
Stabilize
Use a level, uncluttered surface. Keep vessels close, steady, and easy to reach; make sure the opening fits the outlet.
Measure
Use the specified method and read markings at eye level. Account for bubbles or tool dead space when the procedure requires it.
Transfer
Move steadily, keep the outlet near the inside wall when suitable, and stop before overfilling.
Verify
Check the delivered amount when an error would matter. Use a validated method and record the check if required.
Reseal
Close the source promptly to limit spills, exposure, and contamination.
Clean
Wipe drips before they spread; clean or dispose of the tool according to its instructions.
Control the setup before liquid appears
A stable work area gives you room to see the scale and control the transfer. Small layout choices remove avoidable wobble and reach.
Clear, place, then pour
Move the receiving vessel close to the source on a level counter. Clear competing items, set out the tool and cleanup material, and keep the transfer path short.
Fit the outlet to the vessel
A narrow opening can make an otherwise accurate transfer messy. Use a suitable adapter if the equipment calls for one; keep clean tips away from used cloths and debris.
Two outcomes. Check each one.
A neat transfer and an accurate dose are related, but they are not the same result.
Containment
Did the liquid stay on the intended path? Look for drips, residue, or liquid on the outside of either vessel. A short path and controlled motion help limit mess.
Measurement
Did the intended amount reach the receiver? Confirm using a suitable method when accuracy matters; a clean-looking transfer alone cannot answer this.
Reading the bars: these are workflow priorities, not measured performance scores. Tool fit, stable placement, and a deliberate check all contribute to repeatability.
Scale safeguards to the use
The liquid and setting determine the right hygiene, precision, and safety measures.
Keep tools clean
Use food-suitable equipment. Identify common allergens such as milk, soy, or sesame when present, and keep the dosing tip away from contaminated surfaces.
Make it repeatable
Use the same sequence and a short checklist. For coffee liquids or flavorings, a small syringe or pipette can help; espresso grounds need a separate coffee-specific routine.
Follow the procedure
For medication, laboratory work, or hazardous products, use designated tools, protection, validated checks, and manufacturer compatibility guidance.
Make the handoff traceable
A shared routine makes it easier for another person to repeat the dose and spot a missing check.
Choose a dosing tool that fits the liquid and amount
A dosing tool should match the **volume**, the **liquid’s properties**, and the accuracy you need. Use a graduated syringe or pipette for small amounts, a measuring cylinder for larger volumes, and a pump or dispenser when you repeat the same dose often. Check that the parts touching the liquid are compatible with it; a seal that swells or a plastic that degrades can cause leaks and unreliable delivery. Think of tool choice like choosing a shoe: a tool that is too large for a small dose leaves you guessing, while a tool too small for a large transfer makes the job slow and awkward. If you need 3 mL of a liquid for a recipe, a suitable small graduated tool is easier to read than a large cylinder with widely spaced markings. If you portion the same syrup into several drinks, a compatible metered dispenser may reduce repeated open-pour handling. A graduated scale only helps when you can read it clearly. Select a tool whose markings let you see the amount you need, and follow its stated calibration method. Some tools measure what they contain; others are intended to deliver a marked volume. That difference can affect the final amount, especially with liquid that clings to the inside. For viscous liquid, choose a tool and opening designed for the job, then give it the drain time its instructions specify. Before using any tool with a corrosive, volatile, or hazardous liquid, check manufacturer compatibility guidance and the applicable safety procedure. For food, use clean, food-suitable tools, and keep common recipe allergens such as milk, soy, or sesame clearly identified when they are present. A tool that works well for water may not suit oil or a sticky concentrate, so match the setup to the actual contents.As an affiliate, we earn on qualifying purchases.
Build a stable setup before you measure
A stable setup starts with a **level, uncluttered surface**, source and receiving containers that cannot tip easily, and a short transfer path. Place the receiving vessel close to the source so the liquid travels only a few centimeters, and secure containers where practical. These choices reduce both spills and the temptation to rush. Here’s a familiar example: you’re pouring a small amount of vanilla extract into a measuring spoon while holding the bottle over a crowded counter. The spoon wobbles, the bottle opening is far above it, and a drop runs down the side. Put the spoon or receiving vessel on the counter, move the bottle within easy reach, and clear away the coffee scoop and dish towel first. The task becomes calmer because your hands have fewer competing jobs. For a repeatable spill dosing workflow, treat the work area like a small stage: every item has a place before the liquid appears. Set out the tool, source container, receiving vessel, and cleanup material you may need. Check that the receiving opening is wide enough for the outlet, or use an appropriate adapter if the equipment calls for one. A narrow-neck bottle can make an otherwise accurate transfer messy if the tool tip cannot enter cleanly. Keep clean tools away from used cloths, food debris, and surfaces that could contaminate a dispensing tip. If you’re measuring a food ingredient, keep it separate from utensils that touched raw ingredients or allergens. For medication or hazardous products, use the designated procedure and equipment; a kitchen counter routine may not provide the required hygiene or protection. A tidy setup is not decoration. It gives you space to see the scale and control the transfer.As an affiliate, we earn on qualifying purchases.
Follow seven steps for a repeatable, low-mess transfer
To build a no-spill dosing workflow, follow the same sequence each time: **prepare, stabilize, measure, transfer, verify, reseal, and clean**. A steady order helps you notice missing steps before a drop becomes a bigger mess. For example, if you refill a small bottle with a measured liquid, complete each action before moving on rather than opening the source while searching for a funnel.- Prepare: Gather the compatible tool, source, receiving container, and any required protective gear.
- Stabilize: Set both containers on a level surface, close together, with the receiving opening easy to reach.
- Measure: Use the tool’s specified method and read the scale at eye level. Remove visible bubbles from a syringe when appropriate.
- Transfer: Move slowly and steadily. Keep the outlet near the inside wall of the receiving vessel when appropriate, and avoid overfilling.
- Verify: Check the amount delivered when the consequences of an error matter.
- Reseal: Close the source promptly to limit spills, exposure, or contamination.
- Clean: Wipe drips and clean or dispose of the tool according to its instructions.
As an affiliate, we earn on qualifying purchases.
Measure accurately even when a transfer looks clean
A clean-looking transfer does not confirm that the **right amount** arrived. Spill prevention controls where liquid goes; measurement accuracy controls how much you deliver. Treat them as separate checks, especially when the required dose is small or errors carry meaningful consequences. For a tool with a visible scale, hold it at eye level and read the marking as its instructions direct. Looking down at an angle can make the liquid level appear higher or lower. With a syringe, draw liquid slowly and remove visible bubbles when appropriate for the application; an air pocket takes up space and can distort the reading. Follow the tool’s calibration method rather than estimating by eye when accuracy matters. Consider a home example: you need a small measured amount of lemon juice for a dressing. A large measuring cup may be easy to pour from, but its markings can make a small quantity hard to judge. A better-sized graduated tool makes the line easier to read. If you then transfer the juice carefully but leave some clinging inside the tool, your receiving bowl may still get less than the amount you measured. The tool’s intended delivery method and drain time matter. Some devices have **dead space**—liquid that remains in a tip or channel after dispensing. Account for that only as the tool’s instructions specify; do not improvise an adjustment. When the consequences of an error are significant, use a validated procedure and verify the result. Medicine, laboratory, and industrial dosing require safeguards suited to their rules and risks. A tidy counter can support a careful measurement, but it cannot replace the correct method.As an affiliate, we earn on qualifying purchases.
Slow down for thick liquids and narrow openings
Thick liquids need a **compatible opening** and enough time to drain; forcing them through a tool or rushing the final drop can create mess and inconsistent delivery. Viscosity changes how quickly a liquid flows and how much clings to the tool, so a method that works for water may fail with syrup, oil, or a gel. Suppose you’re portioning honey into a warm drink. A narrow pipette may be slow to fill and leave a coating inside, while a wider compatible tool may transfer more smoothly. Move steadily, hold the outlet near the receiving vessel’s inside wall when suitable, and allow the tool to drain as its instructions direct. Avoid shaking or tapping unless the tool’s method calls for it; extra motion can fling droplets onto the counter. Temperature can change how a thick liquid moves. Follow the product’s instructions rather than heating it by guesswork, particularly for food, medicine, or chemical products. If a liquid is sticky, place the receiving container close to the source and use an opening suited to the flow. That short path matters: fewer centimeters in the air means fewer chances for a drip to miss the target. If the tool repeatedly clogs, drips, or retains too much liquid, pause and reassess the tool and procedure. Don’t compensate by guessing an extra amount. For food preparation, clean spills promptly and keep ingredients covered and stored according to their labels; refrigerate perishable foods at **40°F (4°C) or below** and keep hot foods at **140°F (60°C) or above**. If a recipe contains common allergens, such as peanuts, eggs, or wheat, label the container and avoid sharing contaminated tools.Make cleanup, storage, and team handoffs part of the routine
A reliable workflow ends only when the source is resealed, the tool is cleaned or disposed of correctly, and the station is ready for its next use. **Cleanup prevents cross-contamination** and keeps dried residue from making the next dose harder to control. Store a clean, dry tool as directed and protect it from damage or contamination. A household example: you use a small dispenser for cooking oil, then leave it uncapped beside the stove. Dust or food splashes can reach the opening, and a sticky drip can spread along the bottle. Wipe the outside, close it promptly, and store it according to the product label. If the tool is dedicated to one liquid, identify it clearly. Use a shared tool only when its materials are compatible and it can be cleaned adequately. Teams benefit from standardizing the **tool, sequence, cleaning method, and verification step**. A short written procedure can show the dose, where to read the scale, how long a thick liquid should drain, and what to do if the container or tool is damaged. During a café shift change, that note helps the next person reproduce the setup instead of inheriting a sticky mystery. In a workplace handling hazardous liquids, follow the product safety information and the site’s spill procedure; do not handle an unknown or hazardous spill without appropriate training and protective equipment. Digital records, calibrated pumps, and metered closures can support repeatability in settings that need traceability. They still depend on correct setup, maintenance, and compatible materials. A dispenser can reduce open-pour handling, but it does not guarantee the right dose. Close the loop by checking the outcome whenever the stakes call for it.Frequently Asked Questions
What is the best tool for a no-spill dose?
The best tool depends on the volume, liquid, and required accuracy. A graduated syringe or pipette can suit small amounts, a measuring cylinder can suit larger amounts, and a compatible pump can help with frequent repeat doses. Check material compatibility and the tool’s instructions.
How do I measure a small amount accurately?
Use a graduated tool sized for the amount, follow its calibration method, and read the marking at eye level. Remove visible syringe bubbles when appropriate. For doses where errors have serious consequences, use a validated method and verify the result.
How can I stop a liquid from clinging to the tool?
Choose a tool designed for that liquid and follow its dispensing instructions. Thick liquids may need more drain time or a wider compatible opening. Avoid adding an estimated extra amount to compensate for liquid left behind.
Can I use the same dispenser for different liquids?
Only when the dispenser’s materials are compatible with each liquid and you can clean it adequately between uses. For food, medicine, or hazardous chemicals, follow the hygiene and safety procedures that apply to the setting. A dedicated, clearly labeled tool can reduce mix-ups.
Does a no-spill dispenser guarantee the right dose?
No. A dispenser may reduce drips, but the delivered amount still depends on the device, liquid, setup, and technique. Treat containment and accuracy as separate checks, and verify the result when an error would matter.
What should I do if I spill a hazardous liquid?
Follow the product’s safety information and your workplace spill procedure. Do not handle an unknown or hazardous spill without appropriate training and protective equipment. If the procedure calls for help, keep others away and contact the designated responder.
Conclusion
Build your routine around seven actions: prepare, stabilize, measure, transfer, verify, reseal, and clean. Choose a tool that suits the liquid, keep the receiving vessel close, and check the delivered amount when accuracy matters. That simple sequence turns dosing from a hurried pour into a controlled handoff. Leave the station clean, the container closed, and the next dose ready to land where you intend.Halloween Picks
halloween
As an affiliate, we earn on qualifying purchases.