TL;DR

Get coffee and tea gear delivered free — and shop member deals
- Fast, free delivery on millions of items
- Access to Prime Big Deal Days deals on October 6–7
- Prime Video, Amazon Music and more included
Pre-infusion is the phase of an espresso shot where water meets the coffee puck at low pressure (0–4 bars) before full 9-bar extraction begins, letting grounds swell, release CO₂, and settle evenly. Typical pre-infusion lasts 5–8 seconds, and tuning it so the first espresso drops appear 5–8 seconds after pump start reduces channeling and produces sweeter, more balanced shots.
You know that shot. The one where the espresso simultaneously tastes sour and bitter, like someone squeezed a lemon over an ashtray. Nine times out of ten, the culprit isn’t your beans or your tamp — it’s channeling, and water blasting a dry puck at full pressure is what causes it.
Pre-infusion is the fix hiding in plain sight. It’s the gentle, low-pressure wetting phase that happens before your machine ramps up to the full 9 bars, and it can be the difference between a frustrating shot and one that tastes like caramel and stone fruit.
In this guide, you’ll learn what pre-infusion actually does inside the portafilter, which machines offer it (and which don’t), how to tune it by watching your first drips, and how to fake it on a budget machine. This is practical extraction science you can use tomorrow morning.
Pre-infusion runs at 0–4 bars before full 9-bar extraction, letting the puck swell, degas CO₂, and settle evenly to prevent channeling.
Time your first espresso drips: they should appear 5–8 seconds after pump start — the fastest diagnostic for pre-infusion and grind combined.
Start with 5–8 seconds of pre-infusion and adjust in 1–2 second increments; grind slightly finer once dialed in for higher extraction and sweetness.
No programmable machine? Blooming espresso — pump on 3–5 seconds, pause 20–40 seconds, resume — delivers similar benefits for free, but skip it on stale or dar…
Pair pre-infusion with WDT distribution and a level tamp; together they attack channeling from both the water side and the puck side.
Pre-Infusion Explained: The Gentle Start That Can Save a Shot
Nine times out of ten, a shot that tastes simultaneously sour and bitter isn’t a bean problem — it’s channeling. Pre-infusion, the low-pressure wetting phase before full 9-bar extraction, is the fix hiding in plain sight. Here’s how it works, how to tune it, and how to fake it on a budget machine.
Think Sponge, Not Firehose
Pre-infusion eases water into the grounds at low pressure — the way you’d wet a dry sponge — instead of slamming dry coffee with 9 bars. During those few quiet seconds, three things happen inside the portafilter:
Grounds Absorb Water
Coffee particles swell as they take on water, preparing the bed for even saturation long before full extraction pressure arrives.
CO₂ Escapes Upward
Trapped gas from roasting bubbles off gently — the same bloom you see in pour-over — instead of carving channels through the puck under pressure.
The Puck Locks In
The bed expands, settles, and becomes uniform. When 9 bars finally hit, water can’t punch through a weak spot — because there isn’t one. It flows through all the coffee equally.
Without pre-infusion, dry grounds hit by 9 bars instantly find paths of least resistance. Water rockets through channels while barely touching the coffee beside them — so part of your puck is over-extracted (bitter, harsh) and part is under-extracted (sour, thin), in the same sip. That’s why a shot can taste sour and bitter at once.
Does Your Machine Already Do It?
Pre-infusion comes built into more machines than you might expect — including some budget models. Quick check: look for an E61 group head (the distinctive exposed brass group with a lever), a programmable menu, or a flow paddle.
| Method | How It Works | Typical Cost Range | Pre-Infusion |
|---|---|---|---|
| E61 group head | Naturally ramps pressure up over ~5–8 seconds; no settings needed | Mid-to-high prosumer machines | ✓ Built-in |
| Programmable pre-infusion | Set time and pressure (Breville/Sage, Lelit Bianca, La Marzocco Linea Mini/GS3) | Sub-$1,500 and up | ✓ Adjustable |
| Flow profiling | Control water flow in real time with a paddle or app (Decent DE1, Lelit Bianca) | High-end | ✓ Full control |
| Lever machines | Pre-infusion happens naturally when you partially lower the lever | Varies widely | ~ Manual |
| Vibration pump machines | Many have a natural “soft start” as the pump spins up | Entry-level | ✓ For free |
| No features? DIY | Blooming espresso: pump on 3–5 s, pause 20–40 s, resume | Free | ~ Technique |
Tune It in 4 Steps — Watch the First Drips
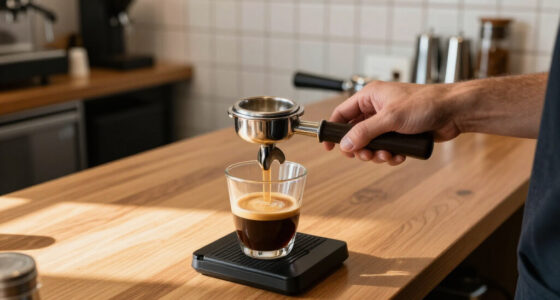
Tuning comes down to one observable signal: when the first drops of espresso appear after you start the pump. Ideally, that’s 5–8 seconds after pump start.
Start at 5–8 s
Use 5–8 seconds of pre-infusion — or your machine’s default if it isn’t adjustable.
Pull & Time It
Watch the spouts or bottomless portafilter and time everything from pump start.
Read the Drips
2–3 s? Too coarse or flow too high. 12+ s? Too fine, or pre-infusion too long.
Confirm by Taste
Sour & fast = finer or longer. Bitter & slow = coarser or shorter. Locked in when sweet and balanced.
No Fancy Machine? Bloom It.
Anyone with a pump switch can fake pre-infusion with the “blooming espresso” technique popularized by Barista Hustle — but skip it on stale or very dark roasts, which have little gas left to escape.
The pause lets grounds saturate and degas exactly like a pre-infusion phase, then extraction resumes on a settled, uniform puck. Similar benefits, zero cost.
What the Testing Says
Industry testing — including work popularized by Barista Hustle and Scott Rao — suggests pre-infusion modestly increases extraction yield and improves balance, especially on fresh coffee.
Once pre-infusion is dialed in, grind slightly finer. Pre-infusion lets you grind finer without choking the shot — and finer grinding raises extraction, which usually means more sweetness in the cup. A bottomless portafilter makes it dramatically easier: channeling shows up as blonde streaks jetting from one spot; even pre-infusion shows as a uniform, slow darkening across the basket.
What Pre-Infusion Actually Is (Think Sponge, Not Firehose)
Pre-infusion is the phase of an espresso shot where water is applied to the coffee puck at low pressure — typically 0 to 4 bars — before the full 9-bar extraction kicks in. Instead of slamming dry coffee with a firehose, you’re easing water into the grounds the way you’d wet a dry sponge: slowly, letting it absorb evenly before it has to pass through.
Here’s what happens during those few quiet seconds. The coffee grounds swell as they absorb water. Trapped CO₂ from roasting escapes upward — that’s the same gas you see bubble off in a pour-over bloom. The puck expands, settles, and locks into a uniform bed.
Why does that matter? Because when full pressure finally arrives, it hits a puck that’s already saturated and stable. Water can’t punch through the weakest spot, because there isn’t one. It has to flow through all the coffee equally — which is the entire point of espresso extraction.
Without pre-infusion, dry grounds hit by 9 bars instantly find paths of least resistance. Those paths become channels. Water rockets through them while barely touching the coffee on either side. The result: part of your puck is over-extracted (bitter, harsh) and part is under-extracted (sour, thin) — in the same cup, in the same sip.
Channeling is why a shot can taste sour and bitter at once. Pre-infusion is the cheapest, simplest defense against it.
Why Those Few Seconds Change Your Shot: The Science Made Simple
Pre-infusion works because it solves three physical problems at once: uneven saturation, trapped gas, and fragile puck structure. Industry testing — including work popularized by Barista Hustle and Scott Rao — suggests pre-infusion can modestly increase extraction yield and improve balance, especially on fresh coffee.
First, the gas problem. Freshly roasted beans (under 2–3 weeks off roast) hold a surprising amount of CO₂. When 9-bar water hits that gas, it disrupts everything — the escaping gas carves pathways through the puck. Pre-infusion gives the gas a window to escape gently, before the real extraction begins.
Second, the forgiveness factor. Pre-infusion compensates slightly for imperfect distribution or an uneven tamp. If your grounds are a little clumpy or your tamp tilted by half a degree, a few seconds of low-pressure wetting helps the bed self-level. For home baristas without a $3,000 grinder and five minutes of puck prep ritual, that’s real value.
Real-world example: a home barista pulling shots on freshly roasted Ethiopian beans gets consistent sour-bitter shots with a 3-second machine default pre-infusion. Extending it to 8 seconds lets the CO₂ escape, the puck settles — and suddenly the same beans taste like blueberry jam instead of a mistake. Same beans, same grind, same tamp. Different pre-infusion.
The exceptions matter too. Dark roasts and stale coffee benefit less — dark roasts are more soluble and release less gas, and stale coffee has already off-gassed in the bag. If your beans are three months old, pre-infusion won’t resurrect them.
Does Your Machine Already Do It? A Breakdown You Can Check in 30 Seconds
Pre-infusion comes built into more machines than you might expect — including some budget models. Here’s a breakdown you can match against your own setup:
| Method | How It Works | Typical Cost Range |
|---|---|---|
| E61 group head | Naturally ramps pressure up over ~5–8 seconds; no settings needed | Mid-to-high prosumer machines |
| Programmable pre-infusion | Set pre-infusion time and pressure (Breville/Sage, Lelit Bianca, La Marzocco Linea Mini/GS3) | Sub-$1,500 and up |
| Flow profiling | Control water flow in real time with a paddle or app (Decent DE1, Lelit Bianca) | High-end |
| Lever machines | Pre-infusion happens naturally when you partially lower the lever | Varies widely |
| Vibration pump machines | Many have a natural “soft start” as the pump spins up | Entry-level |
Quick check: look for an E61 group head (the distinctive exposed brass group with a lever), a programmable menu, or a flow paddle. If your machine has a vibration pump, you likely already get a brief, gentle ramp-up for free.
Don’t have any of that? You’re not locked out — the DIY section below covers blooming espresso, which anyone with a pump switch can do.
How to Tune Pre-Infusion in 4 Steps (Watch the First Drips)
Tuning pre-infusion comes down to one observable signal: when the first drops of espresso appear after you start the pump. Ideally, that’s 5–8 seconds after pump start. Here’s the process:
- Start with 5–8 seconds of pre-infusion — or your machine’s default if you can’t adjust it. Pull a normal shot and time everything.
- Watch the spouts or bottomless portafilter. First drips at 2–3 seconds? Your grind is too coarse or pre-infusion flow too high. No drips until 12+ seconds? Too fine, or pre-infusion too long.
- Adjust one variable at a time. Change pre-infusion duration in 1–2 second increments (or adjust grind), then pull again. Small moves, big differences.
- Confirm with taste. Sour and fast = grind finer or extend pre-infusion. Bitter and slow = coarser or shorter. Locked in when the shot is sweet and balanced.
A bottomless portafilter makes this dramatically easier. You’ll literally see channeling as blonde streaks jetting from one spot, and you’ll see even pre-infusion as a uniform, slow darkening across the basket before the first cohesive drips form.
One pro move: once pre-infusion is dialed, try grinding slightly finer. Pre-infusion lets you grind finer without choking the shot, and finer grinding raises extraction — which usually means more sweetness in the cup.
No Fancy Machine? Blooming Espresso Is Your Free Upgrade
Pre-infusion without a programmable machine is entirely possible — the technique is called blooming espresso, and it was popularized in the specialty community by Barista Hustle. It borrows the pour-over bloom and applies it under pressure.
The idea: run the pump for a few seconds to wet the puck, then pause the pump for 20–40 seconds so the coffee degasses and saturates fully, then resume and finish the shot normally. That pause is the bloom.
On a machine with a momentary pump switch, you do it by hand — pump on for 3–5 seconds, off for 30, on until the shot finishes. It costs nothing but patience. Expect a shot with noticeably more sweetness and clarity, especially on coffee less than two weeks off roast.
Tradeoffs are real, though. A 30-second pause means a 45-second-plus total shot time, and some machines with three-way valves will drip during the pause. If your coffee is stale or dark-roasted, skip it — there’s little gas left to escape, and the long contact time can push toward over-extraction and ashy flavors.
Even simpler: some baristas pulse the pump — two or three short bursts before running continuously. It’s a crude version of pre-infusion, but on an entry-level machine it genuinely reduces channeling versus slamming the puck cold.
When Pre-Infusion Backfires (Yes, It Can)
Pre-infusion can hurt a shot. Overly long pre-infusion — think 15+ seconds of wetting — can cause drips before full pressure arrives, effectively starting a slow, uncontrolled extraction you never intended. On dark roasts, extended wetting time pushes a highly soluble coffee toward over-extraction and bitterness.
The fix is the same timing rule: if espresso is dripping during pre-infusion itself, shorten it or grind finer. First drops belong at 5–8 seconds after pump start, not during the wetting phase.
Here’s your quick troubleshooting reference:
| Symptom | Likely Cause | Fix |
|---|---|---|
| Dripping during pre-infusion | Pre-infusion too long or grind too coarse | Shorten pre-infusion; grind finer |
| First drips after 12+ seconds | Grind too fine or pre-infusion too long | Grind coarser; shorten pre-infusion |
| Shot still sour + bitter together | Channeling from poor distribution | Use WDT; verify level tamp; extend pre-infusion |
| No taste difference at all | Coffee is stale or dark roast (low CO₂) | Use fresher beans; keep pre-infusion short |
And a definition worth keeping straight: pre-infusion is not pressure profiling. Pre-infusion is the gentle start. Full profiling also manipulates pressure after pre-infusion — declining pressure curves, Slayer-style long soaks, the whole playground of flow-profile machines. Related, but not the same thing.
Stack Pre-Infusion With Better Puck Prep for Ridiculous Consistency
The biggest trend in home espresso over the last few years isn’t a machine — it’s puck prep. Pre-infusion is most powerful when you pair it with good distribution and even ground density, because they attack channeling from both sides.
- WDT (Weiss Distribution Technique): stir the grounds with fine needles before tamping to break up clumps — the single biggest channeling reducer
- Puck screens: a thin metal disc on top of the puck that disperses water more evenly as it enters
- Precision baskets: higher, more uniform hole patterns (e.g., 18g precision baskets) that flow more evenly
- Level tamp or self-leveling tamper: removes the tilted-tamp variable entirely
Meanwhile, hardware keeps democratizing. Breville/Sage, Rancilio, and Lelit now build programmable pre-infusion into machines under $1,500 — features that were café-only a decade ago. Flow profiling, once reserved for Slayer and La Marzocco gear, has gone mainstream through the Decent DE1 and the Lelit Bianca’s paddle.
The practical takeaway: if you’re choosing where to spend money and effort, a $15 needle tool plus proper pre-infusion beats a grinder upgrade for most people shooting for consistency. Do the cheap things first.
Frequently Asked Questions
How long should pre-infusion be?
Start with 5–8 seconds and adjust based on when the first espresso drips appear — ideally 5–8 seconds after pump start. If drips come during pre-infusion itself, shorten it or grind finer. Dark roasts generally do better with shorter durations because they’re more soluble and less gassy.
Does my machine have pre-infusion?
Check for three things: an E61 group head (natural 5–8 second ramp-up), programmable settings (common on Breville/Sage, Lelit, La Marzocco home machines), or a flow paddle. Many vibration-pump machines also have a natural soft start as the pump spins up, giving a brief free pre-infusion effect.
Can I do pre-infusion without a fancy machine?
Yes. Blooming espresso is the DIY version: run the pump 3–5 seconds to wet the puck, pause for 20–40 seconds so the coffee degasses, then resume and finish the shot. You can also pulse the pump in short bursts. Both work on machines with a manual pump switch and cost nothing.
Should I grind finer if I’m using pre-infusion?
Often yes. Pre-infusion lets you grind slightly finer without choking the shot, and finer grinding raises extraction yield — which typically means more sweetness and balance. Make small adjustments and confirm with taste, watching that first drips still land in the 5–8 second window.
What’s the difference between pre-infusion and blooming espresso?
Pre-infusion is short (5–8 seconds) and continuous — water flows at low pressure, then full pressure takes over. Blooming espresso involves a deliberate 20–40 second pause after initial wetting, specifically to let CO₂ escape, similar to a pour-over bloom. Blooming is longer, more dramatic, and most valuable with very fresh coffee.
Conclusion
If you remember one thing, make it this: watch your first drips and aim for 5–8 seconds after pump start. That single habit tells you whether your pre-infusion, grind, and puck prep are working together — and it costs nothing to check, every single shot.
The sour-bitter shot that ruins your morning usually isn’t a bean problem or a talent problem. It’s a firehose hitting dry coffee. Slow down the start, let the sponge soak, and taste what your beans were trying to tell you all along.
Fall Picks
fall essentials
As an affiliate, we earn on qualifying purchases.