
TL;DR

Get coffee and tea gear delivered free with Prime
- Fast, free delivery on millions of items
- Prime Video, Amazon Music and more included
- Member-only deals all year
Unplug your grinder, check its manual, and start by brushing away loose grounds with a dry, soft brush. Use grinder-cleaning pellets only if your model allows them, and avoid water, household cleaners, and rice unless the manufacturer specifically approves them. Keep parts in order and check the grind after reassembly.
A grinder can turn a fresh bag of beans into flat-tasting coffee one dusty layer at a time. The culprit may be old grounds and oils caught around the burrs, but a rushed cleaning can create a different problem: damp metal, scratched parts, or a grind setting that no longer behaves the same.
This guide shows you how to clean grinder burrs with the least invasive method that works. You’ll learn what to check before opening the grinder, when cleaning pellets make sense, why rice is a gamble, and how to put everything back without changing your settings by accident.
The basic rule is simple: follow your model’s manual, keep moisture and household cleaners away unless the manual allows them, and stop if anything feels wrong. A few careful minutes can clear stale residue while keeping your grinder ready for tomorrow morning’s first bright, fragrant cup.
Read your grinder manual first; burr material, coatings, access, and approved cleaners differ by model.
Unplug the grinder, empty it, and begin with a dry, soft brush on accessible areas.
Use cleaning pellets only when both the grinder and pellet directions allow them, and discard the resulting grounds.
Avoid water, household cleaners, abrasives, and rice unless your manufacturer explicitly approves the method.
Record your grind setting before disassembly, then stop if the grinder makes unusual noise or produces uneven grounds.
Coffee care / field guide 01
How to Clean Grinder Burrs Without Creating New Problems
Clear stale grounds and oily residue with the least invasive method that works. Protect burr finishes, keep settings steady, and make tomorrow’s first cup taste bright again.
At a glance
Five habits that prevent trouble
Burr materials, coatings, access, and approved cleaners vary. Let the manufacturer’s instructions set the limits.
Find your model and check its cleaning and disassembly instructions first.
Empty the hopper and grounds bin, then brush accessible areas gently.
Use pellets only when both the grinder and product instructions allow them.
Avoid water, household cleaners, abrasives, and rice without explicit approval.
Record settings, reassemble in order, and stop for unusual noise or uneven grounds.
Before you begin
Know what your grinder allows
Flat or conical, removable or fixed, coated or uncoated: designs differ. Routine surface cleaning is not the same as removing burrs.
Read the model guide
Look up approved tools, cleaners, access steps, and whether routine cleaning differs from burr removal.
Protect the setting
Note the grind setting before disassembly. Keep parts and their orientation in order; avoid overtightening.
Don’t force access
If a part resists or the instructions are unclear, clean only accessible areas and contact the manufacturer or a qualified technician.
Step by step
A careful dry clean
Short, controlled steps remove loose coffee without adding moisture or putting fingers near sharp edges.
Disconnect
Unplug power before opening or reaching near burrs.
Empty
Remove beans and grounds as the manual directs.
Brush
Use a dry, soft brush with light strokes; keep fingers clear.
Vacuum, if allowed
Use an approved narrow attachment without pushing parts.
Reassemble
Follow the model’s directions before restoring power.
| Method | What it can do | Decision |
|---|---|---|
| Dry soft brush | Move loose, accessible grounds from the burr area. | ✓ Start here |
| Cleaning pellets | Absorb some oils and dislodge residue; do not replace brushing. | ~ Only if approved |
| Water or household cleaner | May leave dampness or residue, cause corrosion, or harm a finish. | ✗ Avoid on burrs |
| Rice or abrasive tools | May create excess dust, strain parts, scratch surfaces, or affect warranty. | ✗ Unless expressly allowed |
Choosing a cleaning aid
Pellets have a narrow job
Purpose-made pellets can help with some oily residue after loose particles are cleared. Their claims do not make them right for every grinder.
Some oily residue
Use only when the grinder manual and pellet directions both approve. Follow the stated amount and sequence.
For brushing or repair
Pellets cannot inspect every corner, remove every kind of buildup, or correct poor alignment.
Discard the grounds
Follow product directions, including any recommended coffee run, and do not brew grounds containing pellet residue.
Avoid the shortcut
Rice, water, and soap can add risk
A clean-looking grinder is not worth damp metal, damaged coatings, or residue in your coffee.
Why skip rice?
It may be too hard for some grinders, create excess dust, strain components, or conflict with warranty terms. Use it only with explicit approval for your model.
What about removable parts?
A hopper or grounds bin may be washable even when burrs are not. Wash only as directed, away from the grinder, and dry completely before reinstalling.
After cleaning
Restore, then observe
There is no universal cleaning interval. Follow the manual and respond to use, residue, flavor changes, and the manufacturer’s schedule.
Return adjustment parts to their recorded position.
Keep parts in order; follow calibration steps if required.
Run a small amount of beans; discard grounds if directed.
Unusual noise, uneven grounds, or changed settings call for a pause and manual check.
Check your grinder before you reach for a brush
Before you clean grinder burrs, identify your model and read its cleaning instructions; the right method depends on whether the burrs are flat or conical, removable or fixed, coated or uncoated. A method that works for one grinder may damage another, so the manual’s approved tools and cleaners should guide you.
Start with a quick inventory: find the model name, check how the hopper comes off, and see whether the manufacturer describes routine cleaning separately from burr removal. Designs vary. One home grinder may expose the upper burr after you lift off the hopper, while another may need tools or service to reach the same area. Don’t treat those grinders as interchangeable.
Imagine you own a grinder with coated burrs and see a popular online tip recommending a solvent. The tip doesn’t tell you whether that finish tolerates the chemical. Your manual may list an approved cleaner or say to use a dry brush only. That small check can spare you from damaging a coating or affecting a warranty.
Set aside the tools your manual approves before you start. A dry, soft brush is often suitable for accessible grounds; a narrow vacuum attachment or cleaning pellets may be appropriate on some models. If the instructions are unclear, stop at the accessible parts and ask the manufacturer or a qualified service technician. A gentle surface clean beats guessing at a full teardown.
coffee grinder burr cleaning brush
As an affiliate, we earn on qualifying purchases.
As an affiliate, we earn on qualifying purchases.
Remove loose grounds safely, one step at a time
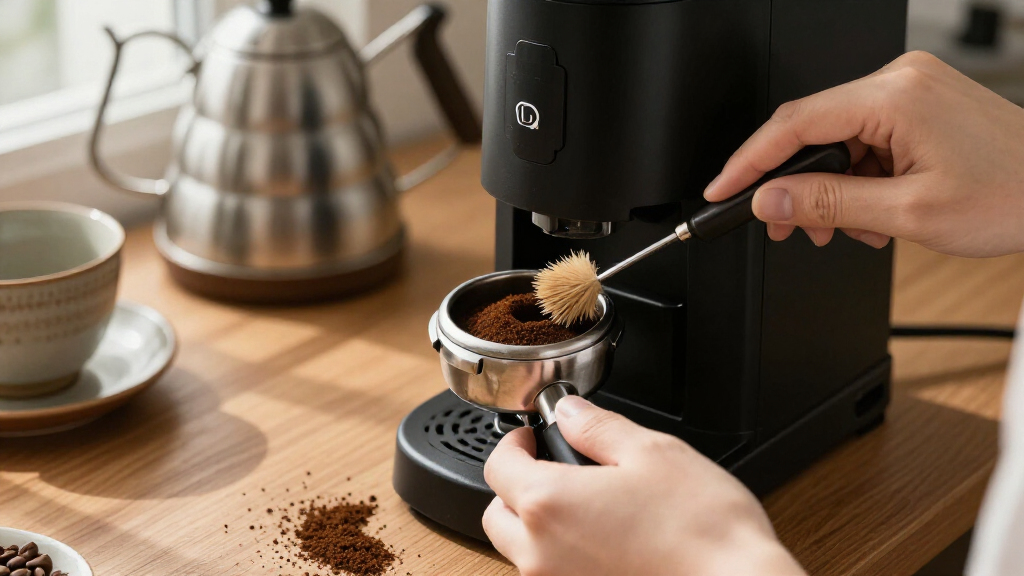
To clean grinder burrs safely, unplug the grinder, empty the hopper and grounds bin, and brush accessible particles away with a dry, soft brush. This basic process removes loose coffee without adding moisture or putting your fingers near sharp edges.
- Disconnect power. Unplug the grinder before opening it or reaching near the burrs.
- Empty the coffee. Remove beans from the hopper and grounds from the bin; follow the manual if it describes a different order.
- Brush gently. Use short strokes to move loose particles out of accessible areas. Keep your fingers clear of burr edges.
- Vacuum only if approved. Use a narrow attachment where the manual allows it, and avoid pushing or bending parts.
- Check the chute and reassemble. Follow the model’s directions, then inspect the grinder before reconnecting power.
For example, if your espresso starts tasting papery after you switch beans, old particles may be sitting near the chute. With the grinder unplugged, brushing and vacuuming accessible areas can clear loose grounds before you try a deeper clean.
Keep metal picks, abrasive pads, and compressed air out of the routine unless your manual specifically permits them. A pick can scratch a surface or bend a component; a blast of air can send fine coffee dust into places you cannot see. Use light pressure and stop if a component resists removal. Routine cleaning should feel controlled, not like forcing a stuck drawer.
As an affiliate, we earn on qualifying purchases.
Use cleaning pellets for the buildup they can handle
Grinder-cleaning pellets can absorb some coffee oils and dislodge residue, but they do not replace brushing or remove every kind of buildup. Use them only if the grinder manufacturer and the pellet instructions allow them, and discard the grounds they produce.
Pellets can help when routine brushing has cleared loose particles but you want an approved way to address oily residue in the burr path. Think of them like a small cleanup crew: they can pick up some of the mess as they pass through, but they cannot inspect every corner or repair a grinder that is out of alignment.
Follow the stated amount and sequence instead of pouring in a generous handful. If the packaging calls for a particular grind setting or for beans to follow, use those instructions only when they also fit your grinder’s manual. Don’t assume that a product’s general claim means it suits every model or burr coating.
Suppose you clean a home grinder and notice a few pale flecks in the grounds afterward. That may be pellet material. Follow the product directions, run any recommended coffee through afterward, and throw out those grounds rather than brewing them. Pellets are a maintenance aid, not food or a shortcut for every cleaning task; visible residue that remains after an approved cleaning may call for manual-guided brushing or service.
As an affiliate, we earn on qualifying purchases.
Skip water, soap, and the rice shortcut
Do not wash grinder burrs or put water, soap, or solvents on them unless the manual explicitly allows it. Moisture can leave metal damp and prone to corrosion, while household cleaners may leave residue or damage a finish. Rice can also be too hard or dusty for some grinders.
That makes the “cheap rice trick” less harmless than it sounds. A handful of rice may seem like a tidy way to scrub away oils, but some grinders can produce excess dust or experience strain from material that is harder than coffee. The manufacturer may also warn that rice voids warranty coverage. Use it only with explicit approval for your model.
Water deserves the same caution. A removable hopper or grounds bin might be washable, while the burrs are not. If the manual allows washing a removable component, take it away from the grinder, wash it as directed, and let it dry completely before reinstalling. A part that looks dry on the outside can still hold moisture in a seam.
Keep water and household cleaners off the burrs unless your manual says otherwise. A clean-looking grinder is no bargain if damp parts corrode or cleaner residue reaches your coffee.
For instance, if oily beans leave a dark film near your burrs, don’t reach for dish soap. Unplug the grinder, remove loose grounds, and use the dry cleaning method your manual permits. If residue remains, check for an approved pellet or ask the manufacturer before trying a more aggressive cleaner.
As an affiliate, we earn on qualifying purchases.
Put the grinder back together without shifting its settings
Reassemble the grinder carefully by keeping each part in order and returning it in the same orientation. Avoid changing the adjustment ring or overtightening screws, and follow the manual’s calibration procedure if burr removal requires one.
Before you take anything off, note the current grind setting or photograph the adjustment dial. Set removed parts on a clean surface in sequence, especially if your model has washers or small fasteners. That makes it easier to restore the original arrangement instead of guessing when you are tired or rushing to make coffee.
Consider a simple scenario: you remove an upper burr to reach trapped grounds, then turn the adjustment ring while cleaning. When you reassemble the grinder, the dial points to the same mark, but a component may have seated differently. If the first grind sounds rough or looks uneven, stop and check the model’s reassembly steps rather than forcing the grinder to run.
Some grinders require calibration after burr removal; others do not. Follow the specified procedure rather than tightening parts until they feel immovable. Do not overtighten screws or adjustment rings, since excess force can make later maintenance harder or affect how parts sit. If you find stripped fasteners, damaged burrs, or persistent rubbing, stop and contact the manufacturer or a service technician.
Choose a cleaning schedule that matches your coffee
There is no single cleaning interval that fits every grinder. Follow the manual, then adjust routine dry brushing and deeper cleaning to your usage, the beans you grind, visible residue, and changes in flavor or performance.
A person grinding one small dose each morning may build residue more slowly than someone making several drinks a day. Dark, oily beans can also leave more visible film than dry-looking beans. Those differences make a fixed calendar rule unreliable; pay attention to what you see, taste, and hear as you use the grinder.
Say you make espresso several times each day with oily beans and notice the grounds chute has started holding clumps. That’s a good cue to check the grinder manual and clean accessible areas. If you make one pour-over a day with less oily beans, you may need deeper attention less often. Your manufacturer’s schedule still comes first in either case.
Keep the routine small. Empty stale grounds, brush accessible parts, and check the hopper and chute according to the manual; reserve deeper cleaning for residue that persists or a manufacturer-recommended interval. Clean when the grinder needs it, rather than dismantling it every few days without a reason. More disassembly means more chances to disturb parts or settings, and a clean burr face cannot make stale beans taste fresh again.
Check the first grind before you make your next cup
After cleaning, check that the grinder runs normally and produces a consistent grind before brewing a full dose. Stop if you hear unusual noise, notice burr rubbing, see uneven grounds, or find that the adjustment no longer behaves as expected.
Reconnect power only after reassembly is complete and the grinder’s exterior is clear. Follow the manual’s startup directions. Some manufacturers recommend running a small amount of beans through after cleaning; when they do, discard those grounds as directed. Don’t improvise a test that contradicts the instructions.
For example, your grinder may sound steady but suddenly produce a mix of fine dust and large chunks. That change can affect extraction: your espresso might run too fast, or your pour-over could taste both thin and harsh. Turn the grinder off and unplug it before inspecting anything. Check that parts sit in their correct positions, then use the manual’s troubleshooting steps.
Stale flavor can have another cause. Grounds may linger in the chute or hopper, or the beans themselves may have lost their freshness. Clean accessible pathways as approved and try a small dose of fresh beans before blaming the burrs. Stop and seek service if the burrs look damaged, fasteners strip, rubbing persists, or the grinder will not adjust or grind consistently after correct reassembly.
Frequently Asked Questions
How often should you clean grinder burrs?
Follow the schedule in your grinder manual, then adjust based on use, bean oils, visible residue, and changes in flavor or performance. Someone grinding several espresso doses a day may need to clean accessible areas more often than someone grinding one pour-over dose each morning.
Can you use rice to clean burrs?
Use rice only if your grinder manufacturer expressly approves it. Rice may be too hard for some grinders, can create excess dust, and may affect warranty coverage. A purpose-made cleaner or dry brushing is a better choice when the manual allows it.
Can you wash grinder burrs with water?
Do not wash burrs unless the manual specifically permits it. Some removable components may be washable, but dry them completely before reinstalling. Damp parts can corrode or affect how the grinder works.
Do you need to remove the burrs every time you clean?
No. Start with accessible cleaning, such as brushing loose grounds away while the grinder is unplugged. Remove burrs only when your manual supports the process or residue cannot be reached otherwise; some models need calibration after removal.
What should you do if the grinder sounds different after cleaning?
Stop the grinder and unplug it before checking anything. Compare the reassembly with the manual and look for a part seated incorrectly or a changed setting. If unusual noise, rubbing, or uneven grinding continues, contact the manufacturer or a service technician.
Conclusion
Start with the manual, unplug the grinder, and use a dry, gentle clean before you consider anything more involved. That simple order helps you remove coffee residue without exposing burrs to moisture, risky household products, or a needless change in alignment.
When you finish, the grinder should sound familiar and the grounds should look steady. Treat it like a well-tuned instrument: brush away the dust, respect its settings, and let the next cup’s bright aroma tell you the cleanup worked.
Halloween Picks
halloween
As an affiliate, we earn on qualifying purchases.