TL;DR
Start with a weighed recipe such as 18 g of coffee in and 36 g of espresso out, then taste the shot before changing anything. Use grind size to correct unusually fast or slow flow, adjust yield to tune strength and balance, and check puck preparation when flavors clash or results vary. Keep a brief shot log and treat time as a clue, not a score.
An espresso shot can hit 28 seconds and still taste like lemon peel and dry toast. That’s because shot time is a clue, not a flavor verdict.

Get coffee and tea gear delivered free with Prime
- Fast, free delivery on millions of items
- Prime Video, Amazon Music and more included
- Member-only deals all year
This guide gives you a simple dial-in decision tree for figuring out what to change when a shot tastes sour, bitter, thin, harsh, or surprisingly good. You’ll start with a repeatable recipe, taste before adjusting, and make one small change at a time.
Think of dialing in as tuning a radio: you turn one useful dial, listen, then decide whether the signal improved. By the end, you’ll know when to adjust grind size, when to change yield, how to spot inconsistent puck preparation, and when to stop. The key points for every home barista are simple: measure what you can, trust your palate, and keep a short record so tomorrow’s cup doesn’t feel like starting over.
Begin with a measured recipe such as 18 g in and 36 g out, then keep dose steady while you adjust.
Taste first: use grind size to address unusually fast or slow flow, and use yield to tune intensity and balance.
If a shot tastes sour and bitter at once or changes wildly, check distribution, tamp, basket cleanliness, and possible channeling.
Treat roast and coffee age as reasons to experiment with ratio or temperature, not as rules that dictate one perfect recipe.
Log dose, yield, time, grinder setting, and tasting notes; stop when the cup tastes good, even if the timer misses a target.
Dial In by Taste One Shot at a Time
A repeatable recipe gives you a clear starting point. Taste first, then change one variable at a time.
Start with a repeatable recipe
Keep the dose, basket, and preparation routine steady so each adjustment is easier to judge.
Use a measured dose and target yield, such as 18 g in and about 36 g out.
Note whether the shot is sour, bitter, thin, harsh, balanced, or a mix.
Pull again with the same dose and preparation, then compare the result.
Use flow and flavor together
Grind size is the first check when espresso runs unusually fast or slowly.
- Thin, sour flavor with quick flow: grind a little finer.
- If flow is reasonable but sourness remains, try a longer yield.
- Drying, bitter flavor with slow flow: grind a little coarser.
- If flow is reasonable, test a shorter yield.
Check preparation when shots vary
Sour and bitter flavors together, or big changes from shot to shot, can point to uneven extraction.
- Check coffee distribution and tamp consistency.
- Make sure the basket is clean.
- Look for signs of channeling before making large recipe changes.
Let the coffee guide the recipe
Roast level and coffee age affect how a shot responds, so treat recipe changes as experiments.
Explore more extraction
A longer ratio or modest temperature increase may help, depending on the coffee and machine.
Try a shorter ratio
A shorter ratio or lower temperature may suit the coffee; taste to decide.
Keep a short shot log
A few notes make tomorrow’s cup easier to repeat and improve.
Start with a recipe you can repeat
A repeatable starting recipe gives you a fair way to compare shots: weigh a fixed dose of coffee, aim for a measured yield, and use the same basket and preparation routine. A 1:2 ratio is a common first try—for example, 18 g of ground coffee in and about 36 g of espresso out—but it is a starting point, not a universal rule.
That baseline matters because changing several things at once makes the result hard to read. If you go from 17 g to 19 g, grind finer, and stop the shot early, you won’t know which change made the cup sweeter. Keep the dose steady while you find a workable grind, then adjust yield separately if the flavor needs it.
Imagine you buy a new medium roast and start with 18 g in the same basket you use each morning. You weigh 36 g out, record the shot time, and taste. That first cup may be too sharp, but now you have a clear reference for your next move. Without those weights, “a little more coffee” or “stop when it looks right” can shift from day to day.
A small espresso scale makes this process much easier, though you can still learn with a careful routine if you don’t own one. Use the same cup and stop at the same visual level while you save for a scale. When you do have one, measure dose and yield; those two numbers turn a vague memory into a recipe you can repeat.
Products Worth Considering

Weber Q 1400 Portable Electric Grill, Gray

De'Longhi Magnifica Evo Automatic Espresso Machine with Milk Frother, Silver

Weber Lumin Portable Electric Grill, Black
As an affiliate, we earn on qualifying purchases.
Follow this taste-first decision tree after every shot
The dial-in decision tree starts with your tongue, then uses flow and time to help explain what happened. Taste each shot before touching the grinder: decide whether it is sour, bitter, thin, drying, balanced, or a mix. Then make one small adjustment and pull another shot with the same dose and preparation.
- Set a baseline: weigh your dose and target yield, such as 18 g in and 36 g out.
- Pull and taste: note the flavor and approximate time. Don’t judge the shot by the clock alone.
- If it is sharp, sour, or unusually fast: grind a little finer. If the flow seems reasonable but the cup remains sour, try a slightly longer yield; a modest temperature increase may also help, depending on the coffee and machine.
- If it is bitter, drying, or unusually slow: grind a little coarser. If the flow seems reasonable, test a shorter yield; a modest temperature decrease is another possible adjustment.
- If it tastes sour and bitter at once, or changes from shot to shot: check puck preparation and look for uneven flow before making a major recipe change.
- Repeat with one change at a time: write down the result and stop when the cup tastes good to you.
For example, a shot that reaches 36 g in 18 seconds and tastes thin and lemony gives you a sensible first experiment: grind finer while keeping dose and yield the same. If the next shot runs more slowly and tastes sweeter, you’ve moved in the right direction. The exact time will vary by coffee and equipment, so treat it as supporting evidence.
Tell sour espresso from bright, fruity espresso
Sour espresso usually feels sharp, thin, and unfinished, while pleasant brightness tastes lively and comes with sweetness or other flavors. The difference is not just the word you use; it is how the whole sip lands. Sourness can pinch the sides of your tongue and disappear quickly, whereas a balanced fruit note may remind you of a ripe berry or a juicy orange.
That distinction matters most with lighter roasts, which often show more acidity than darker coffees. A naturally tart coffee does not need to taste flat or syrupy to be well made. Try a shot both warm and as it cools: some coffees reveal sweetness and fruit as the cup drops in temperature, while a genuinely under-extracted shot may keep tasting hollow and sharply sour.
Suppose your first sip brings to mind green apple skin and lemon, with almost no sweetness. The shot ran fast, too, so grind finer first. If the flow is already steady and the espresso still feels too intense, test a longer yield by letting a little more liquid reach the cup. A small temperature increase can be another experiment, but change it separately so you know what helped.
“More extraction” is not a magic cure for every tart cup. A long yield can make some coffees pleasantly open and sweet, while others turn thin or bitter. Your notes should describe both flavor and feel—“lemony, watery, short finish” tells you more than simply writing “sour.”
Use grind size to fix shots that run too fast or slow
Grind size is usually the first adjustment when espresso flows much faster or slower than expected. Finer grounds slow water as it passes through the coffee; coarser grounds let it move more freely. Pair that flow information with taste: a fast, sharp shot often calls for a finer grind, while a slow, harsh shot often calls for a coarser one.
Make small moves because grinder settings do not map neatly across machines. On one grinder, a tiny turn can change the shot dramatically; on another, several small clicks may barely affect it. If you change the setting by a lot, you could jump from a watery shot to a clogged one and learn little about the steps in between.
Here’s a practical morning example. You set 18 g in and 36 g out, but the espresso gushes into the cup in 16 seconds and tastes both weak and tart. Move the grinder slightly finer, keep the dose and yield fixed, and pull again. If the second shot takes longer and tastes sweeter, keep nudging in that direction only until the flavor improves—not until the timer displays a prescribed number.
If the shot chokes or barely drips, go coarser in a small step and check that you have not accidentally changed the dose. Coffee can also behave differently as it ages after roasting, and some beans respond unevenly to small settings changes. Record the grinder setting next to dose, yield, and time; that makes a useful reference when tomorrow’s espresso starts running differently.
Change yield when the flavor needs more or less intensity
Yield is the amount of espresso you collect, and changing it can tune the drink’s strength and balance after the grind gives you a reasonable flow. Keep your dose steady and let a little more or less espresso reach the cup. A longer yield often makes a concentrated or sour shot feel more open; a shorter yield can help a bitter or diluted shot taste more focused.
Think of the yield as how far you follow the coffee through extraction. The first liquid in the cup is often concentrated and intense, while later liquid adds volume and can change the balance. That doesn’t mean “longer is always sweeter.” Some coffees become pleasant and juicy with extra yield, while others lose body or develop an unwelcome bitterness.
For instance, your 18 g dose produces 36 g out at a steady flow, but the cup tastes overly intense and a little sharp. Try 40 g out, leaving the grind alone. If the next cup tastes more balanced, you have evidence that the coffee likes a longer ratio. If it becomes thin, return to 36 g and try another adjustment, such as a modest temperature change.
Make yield changes easy to compare: change the stop weight, not the grind and stop weight at the same time. If your espresso is already bitter and drying, a shorter yield may help, but check for an overly slow shot first because the grind could be driving the harshness. A scale under the cup turns “a few extra seconds” into a clear, repeatable target.
Check puck preparation when flavors clash or shots vary
When espresso tastes sour and bitter at the same time, or swings wildly between shots, check how you prepared the coffee before making large recipe changes. Water can find easier paths through an uneven coffee bed, a problem called channeling. Those fast paths can leave some grounds under-extracted while water pulls harsher flavors from other areas.
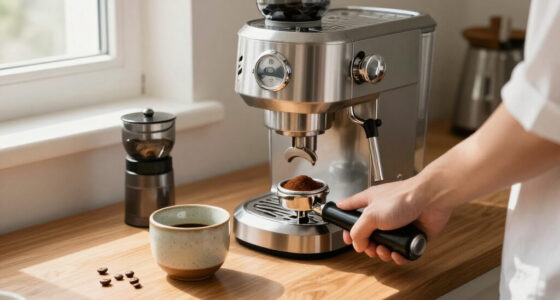
Clumps, uneven distribution, a tilted tamp, or residue in the basket can all contribute to inconsistent flow. Build a simple routine: clear old grounds from the basket, distribute the fresh dose evenly, settle the coffee bed, and tamp level. You do not need a complicated ritual; the goal is to give water a more even path through the puck each time.
Say Monday’s shot tastes sweet, but Tuesday’s same recipe tastes sharply sour and dry. Before changing the grinder, look for clumps or a messy edge around the basket. If you have a bottomless portafilter, streams that spray sideways or emerge unevenly can reveal channeling, though those signs can be tricky to interpret and the tool is not required.
Clean equipment matters, too. Old coffee oils in a basket or on a screen can add stale, bitter notes that mimic a recipe problem. Rinse the basket after brewing and follow your machine’s cleaning instructions; a dirty basket is a poor place to diagnose a carefully measured shot. Once preparation looks consistent, return to the decision tree and adjust one variable at a time.
Let the coffee and roast guide your next experiment
Different coffees respond differently, so use roast level and freshness to choose sensible experiments rather than applying one recipe to every bag. Darker roasts often suit shorter ratios and lower brew temperatures, while lighter roasts may benefit from longer ratios or higher temperatures. These are starting tendencies, not fixed laws; your machine and the coffee itself still matter.
A dark roast that tastes smoky and drying at a long yield may improve if you stop the shot earlier. A light roast that tastes tart and compact might open up with a longer yield or a modest temperature increase. Change one of those at a time and taste the result. If your machine does not offer easy temperature control, focus on grind and yield instead.
Age can shift the behavior of coffee, too. Beans that have just been roasted may release more gas, and older coffee may lose some aroma and behave differently in the grinder. When a familiar grinder setting suddenly produces a faster shot, do not assume your equipment broke; the beans may have changed, or your preparation may be less consistent that morning.
For a concrete comparison, keep the same 18 g dose for two coffees, but don’t expect both to taste best at 36 g out or finish at the same time. A chocolatey dark blend may shine at a shorter yield, while a fruity light roast may need a longer one. Your recipe is a starting map, and the cup tells you where to turn next.
Keep a five-line shot log and know when to stop
A short shot log makes dial-in faster because it turns small experiments into information you can reuse. Record the coffee, grinder setting, dose, yield, time, and a few tasting words. This takes less than a minute, yet it can save you from repeating the same failed adjustment each morning.
Try a note like: “House blend, setting 4.2, 18 g in, 36 g out, 22 seconds; sharp, thin; next: slightly finer.” The following shot might read: “Same recipe, 25 seconds; sweeter, fuller; keep setting.” That small comparison tells you what changed and why you want to keep or reverse it.
For a useful dial-in habit, write the next experiment before you pull the next shot. If the first cup is harsh and slow, your note might say “slightly coarser, all else same.” This keeps impulse adjustments from multiplying after one disappointing sip. A refractometer can add extraction measurements for curious home baristas, but it does not replace tasting or guarantee a delicious cup.
Stop when the espresso tastes good to you. A target time such as 25–30 seconds can help you compare flow, but it is not a pass-or-fail test. One morning, you may prefer a shorter, syrupy shot in milk; another day, you may want a longer, fruitier espresso on its own. Your log helps you return to either cup on purpose.
Frequently Asked Questions
What should I adjust first: grind size, dose, or yield?
Set a consistent dose first, then use grind size to address flow that is unusually fast or slow. Once the flow is reasonable, adjust yield to tune intensity and balance. Change one variable at a time so you can tell what improved the cup.
Should espresso always take 25–30 seconds?
No. That range can serve as a rough comparison point, but coffee, dose, basket, grinder, and personal taste all affect the result. A shot outside the range can taste excellent, and a shot inside it can taste sour or bitter.
Can I fix sour espresso by increasing the yield?
Sometimes. If the flow is already reasonable and the cup still feels too concentrated or sharp, a slightly longer yield can help. If the shot runs unusually fast, try a finer grind first; change yield separately to see whether it helped.
How can I tell whether my shot is channeling?
Uneven or spraying flow from a bottomless portafilter can suggest channeling, but you do not need one to check your routine. Look for clumps, uneven distribution, a tilted tamp, or a dirty basket, especially when a shot tastes sour and bitter at once or varies from one pull to the next.
Do I need a refractometer or bottomless portafilter to dial in espresso?
No. A scale and a steady preparation routine are enough to start measuring dose and yield. A bottomless portafilter can show uneven flow, and a refractometer can compare extraction measurements, but neither replaces tasting the espresso.
When should I stop adjusting my recipe?
Stop when the cup tastes good to you and you can repeat it. The timer is a useful clue, not a score to chase. Record the recipe so you can make that cup again tomorrow.
Conclusion
Your next espresso does not need a perfect timer reading; it needs one clear decision. Start with a repeatable recipe, taste the cup, and change only the grind, yield, or preparation step that the evidence points to.
Write down what worked, then follow that trail back to the cup you want: bright and juicy, rich and syrupy, or simply sweet beside breakfast. The best dial-in is the one that makes you look forward to the next sip.