
TL;DR

Get coffee and tea gear delivered free with Prime
- Fast, free delivery on millions of items
- Prime Video, Amazon Music and more included
- Member-only deals all year
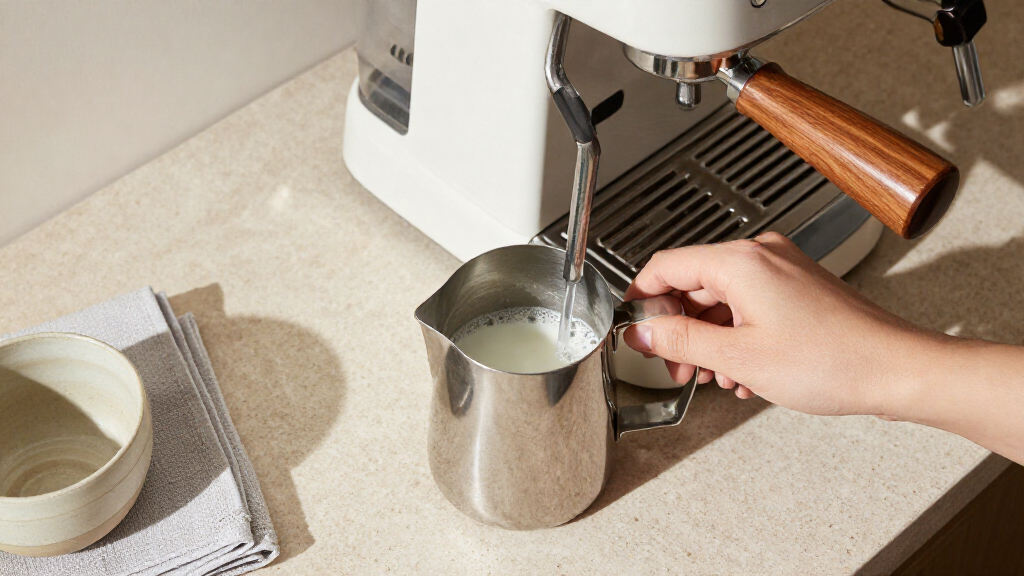
To steam milk quietly, start with cold milk, purge the wand, and hold its tip just below the surface to add air briefly. Lower the tip slightly to create a steady whirlpool, stop around 55–65°C (130–150°F) for many dairy drinks, then swirl the milk until it looks glossy. A soft tearing hiss is normal; squealing or spluttering usually calls for a small change in wand depth or position.
A steam wand can sound like a tiny siren when all you want is a smooth cappuccino before the rest of the house wakes up. The fix usually isn’t to bury the wand and silence it. Quiet milk steaming is mostly about controlling air: add just enough to make microfoam, then circulate the milk until it turns glossy.
That small change matters in the cup. Too much air leaves you with a mountain of dry bubbles; too little gives you hot, flat milk. Here you’ll learn how to steam milk quietly without losing texture, how to read the wand’s sound, and how to adjust for your pitcher, machine, and milk. You’ll also get temperature guidance and practical steps for a better pour, whether you’re making a quick flat white or practicing latte art.
Keep the wand tip just below the surface for brief aeration, then lower it slightly to create a whirlpool.
Listen for a gentle tearing hiss; loud squealing often calls for a small change in tip depth or position.
Use cold milk and a pitcher that leaves room for expansion so you can texture without rushing.
For many dairy drinks, 55–65°C (130–150°F) is a useful starting range; adjust for taste and milk type.
Tap and swirl after steaming, then wipe and purge the wand promptly according to the machine’s instructions.
Coffee craft / Quiet technique
How to Steam Milk Quietly Without Losing Texture
A softer hiss, a finer foam, and a glossy pour start with one small move: add air briefly, then let the milk circulate.
Sound is a cue, not a decibel target
Machines, steam tips, pitchers, and grip all change what you hear. Judge the sound together with milk expansion and movement; perfect silence can mean you have buried the tip too deep.
Soft tearing hiss
Keep the tip just under the surface for a short aeration phase. The milk should expand slightly, not build a thick cap.
Squeal or loud gulp
Lower the tip a fraction or move it slightly away from the pitcher wall. Make one small adjustment at a time.
Quiet, with little foam
Raise the tip carefully until a gentle tear returns. Once the milk has expanded enough, lower it to begin circulation.
Build texture in two phases
Use cold milk and a stable setup. Add only the air your drink needs, then circulate the milk to break larger bubbles into fine foam.
Start cold, leave room
Fill a suitable pitcher partway, usually just below the start of its spout, so the milk can expand.
Purge the wand
Release steam briefly before inserting the tip to clear condensation and help the flow start steadily.
Set the tip near-surface
Place it just below the surface and slightly off-center. Open the steam fully and listen for a soft tear.
Aerate, then lower
Add air briefly. Lower the tip slightly so the milk rotates and the foam becomes fine and even.
Stop before overheating
For many dairy drinks, 55–65°C (130–150°F) is a useful starting range. Turn steam off before removing the wand.
Wipe, purge, swirl
Wipe and purge as your machine directs. Tap gently, then swirl until the surface looks glossy and smooth.
Fix the noise with one small change
A sharp squeal, repeated splutter, or rattling pitcher can point to position, contact, or inconsistent steam. Start with wand depth and pitcher stability.
Lower the tip slightly or shift it away from the wall. A tip that is too high can draw air noisily and make large bubbles.
Check the position and steam flow. Purge condensation; if surging continues, follow the machine’s cleaning and use instructions.
Steady the pitcher with a relaxed grip. Metal contact between pitcher and wand can amplify vibration.
Raise the tip carefully until it draws in a little air, then lower it again once the milk expands.
That can stop aeration and leave hot, flat milk. Keep your face and fingers clear of the wand while steam is running, and follow your machine’s instructions.
Give the milk room to move
Match it to the drink
A brim-full pitcher leaves no room for expansion. An oversized one can make a small serving swirl poorly. Choose a size that lets the milk form a clear whirlpool.
Change one variable
Cold milk gives you more time to texture. Barista-style oat, soy, and other alternatives can foam reliably, but brands vary in texture and preferred temperature.
Let the process take time
Steam power and tip design differ. With a gentler machine, adjust slowly and use sound, expansion, and rotation together instead of relying on a fixed time.
+ room
the wand
aeration
+ whirlpool
+ pour
Use the wand’s sound to keep the foam silky
Quiet milk steaming means adding air with a soft, controlled hiss and then circulating the milk to form fine foam. A little sound is normal; a loud squeal, howl, or repeated splutter usually means the wand tip sits poorly or the steam flow is uneven. Listen for a gentle, intermittent tearing sound during the short aeration phase.
Think of the wand as a small whisk that first lets in air and then folds it through the milk. If the tip sits too high, it gulps air noisily and makes big bubbles. If it sinks too deep, the milk can heat with little foam. The sweet spot is close to the surface, just under it, where a small adjustment changes the sound without stopping the steam.
For example, if your morning latte starts with a piercing squeal, lower the tip a fraction and angle it slightly off-center. If the sound disappears and the milk stays flat, raise it just enough to hear a soft tear again. Make one small change at a time; chasing silence by pushing the tip deep can solve the noise while costing you the texture you wanted.
There isn’t one universal sound level for every machine. Steam tips, pressure, pitchers, and even how firmly you hold the pitcher affect what you hear. A steady, quiet hiss is a better guide than trying to make steaming completely silent.
Products Worth Considering
Breville Grind Control Coffee Maker with Thermal Carafe, Brushed Stainless Steel

Cuisinart 14-Cup Food Processor with 720-Watt Motor, Stainless Steel (DFP-14BCNY)

Cuisinart CPZ-120 Indoor Pizza Oven, Stainless Steel
As an affiliate, we earn on qualifying purchases.
Follow these steps for quieter steaming and glossy milk
To steam milk quietly, use cold milk, purge the wand, add air briefly at the surface, and then lower the tip to start a whirlpool. This sequence gives you control over foam and heat instead of letting a noisy wand dictate the result. Aim for glossy, evenly mixed milk that pours in a smooth stream.
- Start cold and leave room. Use cold milk and fill the pitcher only partway, usually to just below the start of its spout. A nearly full pitcher leaves little space for the milk to expand; an oversized pitcher can make the wand hard to position.
- Purge the wand. Briefly release steam before putting the tip in the milk. This clears condensation and helps the steam start steadily. Keep your hand clear of the steam and follow your machine’s instructions.
- Place the tip near the surface. Set it just below the milk’s surface, slightly off-center, then open the steam fully. Listen for a soft, intermittent paper-tearing sound. Use a small depth adjustment if the wand squeals or draws in air too loudly.
- Aerate briefly, then circulate. Keep the tip near the surface only long enough to add the foam your drink needs. Lower it slightly to stop drawing in air and encourage the milk to rotate. That whirlpool helps break larger bubbles into fine microfoam.
- Stop before overheating. For many dairy drinks, a useful range is 55–65°C (130–150°F), though taste and milk type affect the target. Turn off the steam before removing the wand.
- Wipe, purge, and finish. Wipe the wand promptly with a clean damp cloth, then purge it as your machine maker directs. Tap the pitcher gently and swirl the milk until the surface looks smooth and glossy.
For instance, if you’re making one small flat white, watch for a slight increase in milk volume rather than waiting for a thick foam cap. Every machine and pitcher behaves differently, so use the sound, visible expansion, and milk movement together instead of relying on a fixed aeration time.
Fix squeals, splutters, and pitcher rattles one adjustment at a time
A squealing wand usually means the tip is too shallow, touching the pitcher wall, or working with unstable steam flow. A splutter can point to inconsistent steam or a tip position that repeatedly breaks the milk’s surface. Start with wand depth and pitcher stability before changing several things at once.
If the sound is a sharp squeal, lower the tip slightly or move it a little away from the wall. If the pitcher chatters on the grate, steady it with a relaxed grip rather than pinning it hard against the wand. Contact between metal parts can amplify vibration, much like a spoon rattling inside a mug.
A different problem is silence paired with almost no foam. The wand may be too deep, or the tip may not sit where it can draw in a little air. Raise it carefully until you hear a gentle tear, then lower it again once the milk has expanded enough. In a kitchen with a modest home machine, the steam may be less forceful and the process may take longer; rushing the depth change can produce large bubbles.
If the steam keeps surging even with a stable position, check that you have purged condensation and consult the machine instructions for cleaning and use. Don’t put your face or fingers near the wand to inspect it while steam is running. A controlled hiss and a rotating surface are useful signs; loud noise alone doesn’t tell you whether the milk is textured well.
Choose a pitcher and milk that give you room to work
The right pitcher leaves space for expansion and lets you keep the wand tip in a stable position. The right milk gives you enough time to texture it before it gets too hot. Together, pitcher size and milk choice can make quiet steaming easier, though neither can compensate for a tip placed too high or too deep.
A pitcher filled to the brim is difficult to aerate without splashing, while a very large pitcher can make a small serving swirl poorly. For a single drink, choose a pitcher suited to that amount and leave room above the starting milk level. If you’re preparing two drinks, use a larger pitcher only when the milk volume creates a clear whirlpool rather than a slow, motionless pool.
Dairy milk is a familiar starting point, but alternatives vary. Barista-style oat, soy, and other plant-based drinks are generally made to foam more reliably, yet brands can differ in texture and preferred temperature. If your oat drink turns grainy or tastes cooked, try a lower temperature and change only one variable at a time. A carton that works beautifully for steaming may not behave like the one beside it on the grocery shelf.
For example, test a new plant-based drink in the same pitcher with the same wand position you use for dairy. Note how much it expands, whether a whirlpool forms, and how it pours after a brief swirl. That gives you a useful comparison without assuming every milk needs identical aeration or heat.
Hit a useful temperature without cooking the milk
For many café-style dairy drinks, aim for about 55–65°C (130–150°F) and stop the steam before the milk overheats. This range offers a practical starting point, not a rule that suits every drink or milk. A thermometer can help while you learn how your machine behaves, especially if you often steam small portions that warm quickly.
Temperature affects flavor as well as texture. Milk that gets too hot can lose the gentle sweetness you expect, and some plant-based drinks can turn unpleasant before dairy would. On a home machine with slower steam, the longer heating time can tempt you to keep aerating; add the needed air early, then focus on circulation while the milk warms.
Imagine steaming a small pitcher for a flat white: you hear the initial soft tear, lower the tip, and keep the milk turning. If you continue adding air all the way to the end, the foam can become thick and dry even if the final temperature is in range. Aeration and heating are separate phases, so stop introducing air once the milk has expanded enough for your drink.
After you shut off the steam, tap the pitcher gently and swirl it. The sound of a bubble popping is fine; what matters is whether the surface becomes shiny and the milk moves as one mixture. If it separates into a liquid layer and a stiff cap, use less air next time or spend longer creating a steady whirlpool.
Pour latte art from milk that moves as one smooth ribbon
Milk suited to latte art has fine, integrated microfoam, not a stiff layer of bubbles sitting above liquid. After steaming, a gentle tap and swirl help disperse any remaining bubbles so the pitcher pours in a smooth ribbon. Quiet steaming supports that texture because it limits the large, uneven bubbles that loud surface gulping can create.
Try this with a cappuccino or flat white: after steaming, swirl the pitcher until the milk looks like wet paint, then pour promptly. If the first splash looks watery and the last spoonful is mostly foam, the milk separated before or during the pour. If the stream stays even and glossy, you’ve got a better chance of drawing a clear pattern, even if you’re only making a simple heart.
Latte art doesn’t require a mountain of foam. The aim is enough air to make the milk creamy and flexible while keeping it fluid enough to blend with espresso. A pitcher that is too full can make that movement hard to judge, while one suited to your serving makes it easier to tilt and pour steadily.
Practice with one drink at a time. Notice whether the milk expands slightly, rotates in the pitcher, and settles into a glossy surface after a swirl. Those visible cues are more useful than trying to force a pattern from milk that has already separated.
Clean the wand right away to keep the next drink tasting fresh
Clean the steam wand immediately after steaming by wiping it with a clean damp cloth and purging it according to your machine’s instructions. Milk residue dries quickly into a sticky film that can block a tip, affect steam flow, and make the next steaming session sputter. Prompt cleaning is part of reliable texture, not just tidying up.
For example, if you finish a cappuccino and leave the wand until after breakfast, dried milk can cling around the tip’s holes. The next time you steam, the flow may sound uneven or feel weaker. Wiping and purging promptly reduces that risk; keep the cloth reserved for the wand so you don’t spread milk residue across your counter or other surfaces.
Use care around hot steam and metal. Turn off the steam before removing the wand from milk, keep your hands away from the outlet, and follow the manufacturer’s cleaning directions. If a tip needs deeper cleaning, use the method and tools approved for your machine rather than forcing a pin into an opening or improvising with chemicals.
A clean wand also makes troubleshooting easier. When the steam stream is steady and the tip is clear, a squeal is more likely to come from position or pitcher contact than from a residue-clogged hole. That means you can make a small adjustment and get back to a quiet, glossy pour.
Frequently Asked Questions
Should steaming milk make noise?
Yes. A soft hiss or intermittent tearing sound is normal while you add air. A loud squeal, howl, or repeated splutter often means the tip position or steam flow needs attention.
How long should I aerate the milk?
Aerate only long enough to add the foam your drink needs; there is no single time that fits every machine, milk, and serving size. Watch for a slight increase in volume, then lower the tip so the milk circulates.
Why does my milk turn bubbly instead of silky?
The wand may be too close to the surface for too long, creating large bubbles, or the milk may not be circulating enough to break them down. Add air briefly, then lower the tip slightly and look for a steady whirlpool.
Can I make latte art with less foam?
Yes. Latte art needs fine, integrated microfoam that still pours smoothly, rather than a thick cap of stiff foam. Swirl the pitcher after steaming and look for a glossy surface before you pour.
What temperature should I use for plant-based milk?
Plant-based drinks differ by brand and type, so use the carton’s guidance when available and avoid overheating. Try a thermometer as you learn, then adjust based on taste and whether the drink stays smooth after steaming.
How do I keep the steam wand clean?
Turn off the steam, wipe the wand promptly with a clean damp cloth, and purge it as your machine maker directs. This removes residue before it dries and helps keep the next steam flow steady.
Conclusion
Remember the rhythm: air briefly, circulate steadily, stop before overheating. Start with cold milk, listen for a soft tear, and lower the tip once the milk has expanded enough. If the wand squeals, make a small position change and watch the milk’s movement; a silent wand with flat milk hasn’t solved the problem.
When the pitcher turns glossy and pours like a smooth ribbon, you’ve got the texture. Let the kitchen hear a gentle hiss, then let the cup do the talking.