TL;DR

Get coffee and tea gear delivered free with Prime
- Fast, free delivery on millions of items
- Prime Video, Amazon Music and more included
- Member-only deals all year
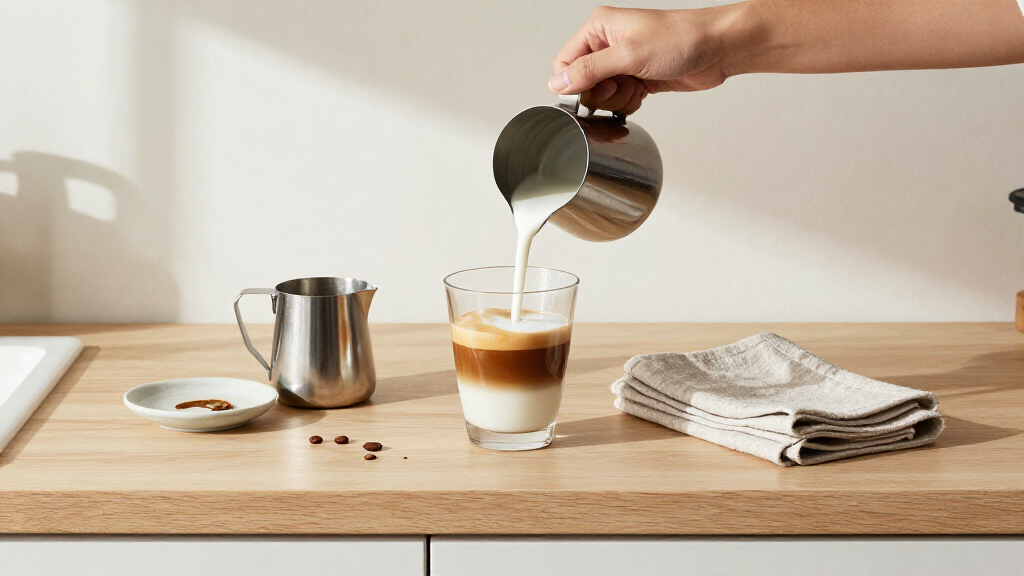
To layer an iced espresso drink neatly, put syrup in a clear glass, add plenty of ice and cold milk, then pour espresso slowly over a spoon or down the glass wall. Leave headroom, use measured amounts, and serve promptly: layers are a temporary presentation effect, not a permanent separation.
A fast espresso pour can turn a striped iced latte into one tan swirl before you’ve even found a straw. Neat layers depend more on density, temperature, and pour speed than on a fancy machine or a special glass. Get those three details right, and you can make a striking drink without coffee splashing across the counter.
This guide shows you how to layer an iced espresso drink, adapt the method for hot drinks, and fix the most common problems. You’ll also learn what a spoon actually does, why layers fade, and when it makes sense to stir. A clear glass and a little patience are enough to get started.
Think of each ingredient as a guest arriving at a crowded table: heavier ingredients settle lower, while a gentle pour gives everyone room to keep their place. The result does not need to look like a café video. A clean three-stripe drink that tastes good is a win, even if the edges soften after a few minutes.
For a typical iced layered latte, add syrup first, then ice and cold milk, and pour espresso last.
Use a spoon or pour gently down the glass wall to reduce the stream’s impact on the milk.
Leave headroom and keep the glass stable to prevent splashes and overflow.
Layers naturally soften as temperatures change and ice melts; serve promptly and stir if you prefer an even flavor.
Practice with a small drink and your usual glass before making several servings.
Layer espresso drinks without the mess
Neat layers depend on density, temperature, and a gentle pour. A clear glass and a little patience are enough to get started.
Build an iced drink
Add ingredients in an order that gives espresso a chance to sit visibly above the milk.
Measure it into a clear, sturdy glass.
Fill generously, leaving room below the rim.
Add it slowly in a steady stream.
Pour over a spoon or gently down the glass wall.
Enjoy the stripes, then stir if you prefer an even flavor.
What keeps layers neat
A forceful stream or hot espresso hitting cold milk can stir the layers together.
Heavier settles lower
Syrup often goes first; milk and foam are lighter. Exact order depends on the recipe.
Keep iced drinks cold
Ice helps keep components distinct and gives the pour a surface to hit.
Soften the stream
A spoon is helpful but optional; pouring down the glass wall also reduces impact.
Choose your setup
| Tool | How it helps |
|---|---|
| Clear, tall glass | Shows the layers as you pour |
| Spoon | Breaks up the force of the espresso stream |
| Small pitcher | Makes a narrow, controlled pour easier |
| Headroom | Leaves space for ice and helps prevent splashes |
Fix common problems
- Pour more slowly and closer to the glass.
- Use a spoon or guide the stream down the inside wall.
- Leave headroom and avoid pouring from too high.
- Use freshly textured, glossy milk foam.
- Add it gently and leave room for the other ingredients.
- Measure ingredients and use a consistent glass for even layers.
Why density, temperature, and a gentle pour keep layers neat
How to layer espresso drinks without making a mess comes down to controlling how quickly one ingredient pushes into another. Denser liquids tend to settle beneath lighter ones, while hot ingredients, fast pours, and strong splashes encourage layers to mix. When you understand those forces, the order and pace of your pour make more sense.
Syrup is often the densest ingredient, so it usually goes at the bottom. Milk sits above it, and espresso can form a darker band as you pour it gently over the milk. But this is a helpful starting order, not a law: the ingredients, their proportions, and their temperatures all affect what happens in the glass.
Temperature can make a beautiful drink blur. A very hot espresso shot hitting cold milk transfers heat and creates movement right where the ingredients meet. Ice helps keep an iced drink cold and gives the espresso a surface to hit, though the result still depends on your pour. For a hot layered drink, use a warmed glass and serve it quickly; heat tends to make the separation less stable.
Think of the pour as a small waterfall, not a faucet turned full blast. A narrow, steady stream carries less force into the milk than a thick stream falling from several inches above the glass. For example, if your espresso lands in the middle with a loud splash, it will probably stir up the milk; if it trickles down a spoon, you give the layers a better chance.
Good layers are a serving moment, not a promise that ingredients will stay separated forever. Temperature changes, melting ice, and stirring gradually bring them together.
Products Worth Considering

Cuisinart Chef's Classic 7-Piece Stainless Steel Cookware Set

Cuisinart MultiClad Pro 12-Piece Stainless Steel Cookware Set

Cuisinart Chef's Classic 17-Piece Stainless Steel Cookware Set
As an affiliate, we earn on qualifying purchases.
How to build an iced espresso drink in five tidy steps
How to layer espresso drinks is easiest to learn with an iced latte-style drink: start with syrup, add ice and milk, then finish with espresso. Keep the glass steady on the counter, pour close to the surface, and leave space at the top. This order gives the espresso a chance to sit visibly above the milk rather than plunging straight through it.
- Add syrup first. Measure it into a clear, sturdy glass. For a first try, use the amount your recipe calls for rather than adding a generous free-pour; extra syrup can change the drink’s sweetness and layering.
- Add ice, leaving headroom. Fill the glass generously, but stop below the rim. Ice cools the drink and gives the stream a surface to meet, while headroom protects your counter from an overflowing splash.
- Pour in cold milk slowly. Aim for a steady stream. If you add foam, use glossy, freshly textured foam and leave enough room for the espresso and topping.
- Add espresso last. Pour it over the back of a spoon held just above the milk, or guide it gently down the inside wall of the glass. Keep the spout close; a high pour adds impact.
- Serve promptly. Take a moment to enjoy the stripes, then stir if you prefer a more even flavor in every sip.
Try the method with a small drink before making a large one for guests. If you use a 12-ounce glass, don’t fill every inch with ingredients just to reach the rim; leave a little breathing room. The smaller test lets you adjust your pour without wasting a full serving or wiping espresso off the counter.
There is no single correct look for every recipe. A macchiato, a latte macchiato, and an iced latte can use different ingredient orders and proportions, and drink names vary by café and region. Follow the recipe you intend to make, then use gentle pouring to preserve its intended presentation.
Choose a glass and pouring tool that give you control
A clear, sturdy glass with enough room for ice and a few centimeters of headroom makes layered drinks easier to pour and serve. A tall glass shows the layers, while a narrower opening can help you keep the stream under control. You do not need a dedicated coffee glass; a clean drinking glass can work if it is suitable for the drink’s temperature and not filled to the brim.
A spoon is useful because it breaks up the force of the espresso stream. Hold the back of the spoon just above the milk and pour onto its curved surface, letting the coffee spread gently into the glass. If the spoon is missing, aim the stream down the inner wall instead. Both techniques reduce the sharp impact of espresso falling directly into the center.
A small pitcher with a narrow spout can make the pour easier to control, especially when you’re working with a short espresso shot. Still, a regular espresso cup can work if you bring it close to the glass and tilt it gradually. For a first practice, try pouring water into a glass of milk or water over ice; it lets you rehearse the height and speed before making coffee.
Here’s a simple counter setup: set the glass beside the espresso machine, place your spoon within reach, and keep a cloth nearby. Add the syrup and milk before pulling the shot, so you aren’t rushing around with hot coffee in one hand and a spoon somewhere across the kitchen. Good preparation prevents spills just as much as a careful pour does.
- Clear glass: lets you check the bands as you pour.
- Spoon: softens the stream, but is optional.
- Small pitcher: helps when you want a controlled, narrow pour.
- Headroom: gives you room for ice, foam, and a steady pour without overflow.
Fix sinking espresso, splashes, and collapsing foam
If your espresso disappears into the milk, the first fix is usually a slower, lower pour. Pouring speed and impact can disrupt a layer even when your ingredients are in a sensible order. Try the spoon or glass-wall method before changing the recipe; a small adjustment to your technique may be all the drink needs.
If coffee sinks in a sudden dark plume, bring the cup closer to the glass and pour in a thin stream. Check that the glass has plenty of ice and that the milk is cold for an iced drink. A very hot shot can warm the surrounding liquid and encourage mixing, so you can also let the espresso rest briefly before pouring. Don’t expect a perfectly sharp line every time; the thickness of each ingredient matters too.
If the drink splashes over the rim, leave more space and stop pouring from above the glass. For example, a nearly full glass can overflow when ice shifts under the stream, even if you pour carefully. Use a smaller quantity, set the glass on a stable surface, and pour close to the milk. Wiping a small drip is easier than rescuing a full countertop puddle.
Foam that collapses may be too dry, too loose, or handled too roughly. Glossy, freshly textured milk is generally easier to place gently than stiff, dry foam. Add it slowly as a topping, and don’t pack the glass so tightly that the espresso has nowhere to go. If your layers look uneven, measure your ingredients and use the same glass for a few practice runs; consistent proportions make the result easier to repeat.
Layered espresso drinks without a machine are possible, too. Strong coffee brewed by another method can give you the dark layer, although it will not taste or behave exactly like espresso. Use a small, concentrated amount and pour gently. The aim is controlled layering, not pretending a different brewing method makes an identical shot.
Set realistic expectations for hot drinks, milk alternatives, and fading layers
Layers can look striking, but they are temporary: there is no fixed time that every layered drink stays separate. As the espresso and milk exchange heat, as ice melts, or as the glass moves, the boundary softens. The ingredients may begin blending before you finish taking a photo, especially in a warm room or with a hot drink.
Iced drinks often show cleaner contrast because cold milk and ice help slow the spread of a fresh espresso pour. Hot drinks can still have visual layers, but the warmth and movement make them less stable. Warm the glass, build gently, and serve promptly if you’re making a hot layered drink. Think of the result as a snapshot: it can be lovely without being permanent.
Dairy-free milks can work, but brands and formulations behave differently. Some pour smoothly; some foam more readily; others separate or blend in ways that change the look. If you’re using an unfamiliar milk, test a small drink first instead of serving it to a group and hoping for matching stripes. The same caution applies to flavored milks and sweetened alternatives, which can alter both density and sweetness.
A layered drink is also not a test of espresso quality. It is a way to show different ingredients in one glass. You may enjoy the first sip as it is, then stir the rest to combine the flavors. If you’re preparing drinks for friends, say which recipe you made and whether you recommend stirring; a beautiful latte macchiato and an iced latte can have different orders and drinking expectations.
For food safety, keep milk refrigerated until you use it and return it promptly to the refrigerator after pouring. Don’t leave a finished milk-based drink sitting out for an extended period. For hot milk, use a food thermometer if you need to check temperature; avoid overheating it, and follow your recipe or equipment guidance.
Practice once with a small drink before serving a crowd
The easiest way to get repeatable layers is to practice with small, measured pours before making drinks for guests. That gives you a chance to find a comfortable glass, test how your milk behaves, and learn how slowly you need to pour. A full glass with melting ice and a waiting audience is a poor place to discover that your pitcher makes a wide, splashy stream.
For a low-stakes rehearsal, fill a clear glass with ice and cold milk, then pour a little water over a spoon. Watch where the stream lands and how quickly it spreads. Water won’t perfectly mimic espresso, but it helps you get used to holding the spoon and keeping the pour low. Then make one small coffee drink and adjust only one thing at a time: pour speed, spoon position, or ingredient quantity.
Use the same glass for your first few attempts. A narrow glass and a broad tumbler can make identical amounts look quite different, so changing glass shape every time makes it harder to spot what worked. If your first pour mixes, don’t start over immediately; note whether the stream was fast, the espresso very hot, or the glass nearly full. One clear observation helps more than guessing at three fixes at once.
When you’re making drinks for several people, prepare the glasses, ice, milk, and spoons before pulling the espresso shots. Build each drink in turn and serve it as soon as it’s ready. That keeps the first drink from sitting while you troubleshoot the last, and it leaves you free to focus on the satisfying part: watching a dark ribbon of espresso settle above pale milk.
Frequently Asked Questions
Which ingredient goes in first?
For many iced layered drinks, syrup goes in first, followed by ice and cold milk, then espresso. The exact order depends on the recipe and ingredient proportions, so follow the drink you’re making rather than assuming every espresso drink layers the same way.
Should espresso go over or under the milk?
For a common layered iced latte, pour espresso over the milk and use a spoon or the glass wall to soften the stream. Other drinks use different orders, so check the recipe’s intended build if you’re making a named café drink.
Do I need a spoon to layer espresso drinks?
No. A spoon helps disperse the pour, but you can pour slowly down the inside of the glass instead. Keep the cup close and use a thin stream to avoid splashing into the milk.
Why do my espresso layers keep mixing?
The usual causes are a fast or high pour, too little ice, very hot espresso, or ingredients with similar densities. Try a lower, slower pour over a spoon and serve the drink promptly. Some softening is normal as the drink warms and the ice melts.
Can I make layered espresso drinks without an espresso machine?
Yes. You can use strong coffee made with another brewing method, though the flavor and concentration differ from espresso. Use a modest amount and pour gently over the milk so the stream does not break up the layers.
Can I layer dairy-free milk?
Yes, but results vary by brand and formulation. Some alternatives foam or pour differently, so try a small serving first and adjust your pour rather than expecting every carton to create the same clean bands.
Should I stir a layered drink before drinking it?
That depends on how you like the flavor. The layers are mainly for presentation, so you can enjoy a sip before stirring or mix the drink for a more even taste throughout.
Conclusion
Remember this simple formula: heavier ingredients first, cold milk and plenty of ice, then a slow espresso pour close to the glass. A spoon can help, but careful aim and headroom matter more than specialized equipment. If the layers soften after a few minutes, your drink has not failed; it has simply become ready to stir.
Set a clear glass on the counter, pour slowly, and enjoy that dark espresso ribbon settling into pale milk. The best layered drink is the one you can make cleanly and like to drink.